


By Koen Van Impe July 31, 2020
MISP Galaxies
MISP Galaxies and Clusters are an easy way to add context to data. Compared to the relatively simple concept of tags and taxonomies, they allow you to add more complex data structures. There is already a large list of galaxies and clusters available as a community effort, and directly accessible within MISP, but it’s always possible these do not fully address your needs.
So how to add your own cluster and galaxy? There are contribution guidelines but these do not describe how to start from scratch. This post attempts to get you started with developing your own MISP galaxy and cluster.
Concepts
First some basic concepts
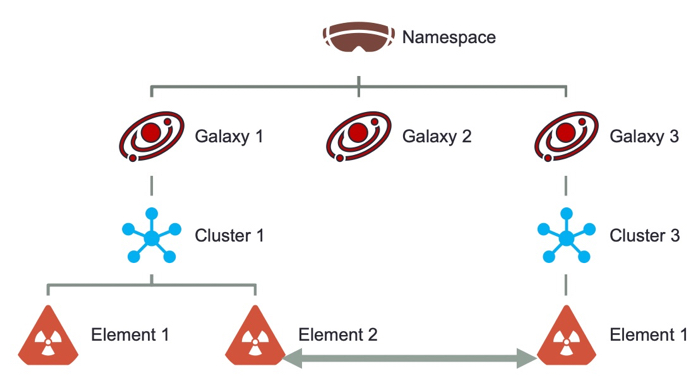
- Galaxies are stored in namespaces;
- A galaxy describes the data, it contains the metadata;
- The cluster is the individual instance of the galaxy and contains the data elements;
- A cluster consists of elements, which are the “real” data;
- Besides their description and value, these elements can contain synonyms and references to other clusters (elements).
There are two types of galaxies, the regular galaxy and the matrix galaxy.
The difference between both is already clear when you add them in the MISP interface. In essence the matrix style galaxies allow you to select -multiple- values in a matrix-style like (obvious, right?), whereas the regular galaxy is a straightforward element from a list. You will most likely recognise these matrix types from the galaxies used to represent the MITRE ATT&CK Framework
Galaxies and clusters are stored in JSON files, one in the directory galaxies, and one in the directory clusters.
The name of the JSON file in both directories needs to be the same.
Demo case
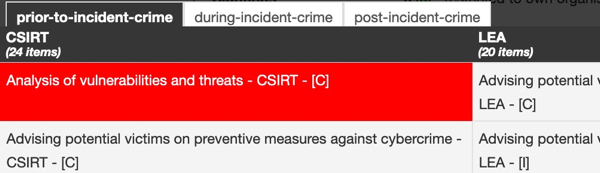
For this demo I will use the Segregation (or separation) of Duties (SoD) Matrix for CSIRTs, LEA and Judiciary as an example to build a new matrix. The SoD matrix is a method to assign for different actors their roles and duties during the cybercrime investigation lifecycle phases.
The SoD matrix consists of three phases (prior, during and post incident), four actors and then for each of these actors’different roles and duties.
Build your own galaxy
Fork the repository
Because the goal is to contribute the new galaxy and cluster to the community, it’s best to first fork the Galaxy Github repository, add the changes to the local copy and then submit the changes as a pull request.
Create the files
For this new galaxy there are two new files which need to be created. In a default MISP install you can find these files under /var/www/MISP/app/files/misp-galaxy but you can also use the location where you created the local copy of the Github repository.
touch galaxies/sod-matrix.json
touch clusters/sod-matrix.json
Pick your namespace
The first step is to select a namespace. A galaxy can be added to an existing namespace, or to a new one. From a functionality point there is no real difference. Consider the namespace as the container for the galaxy. Because there is no namespace which fits the SoD matrix, I will use a new namespace. This namespace is defined in the galaxy file.
galaxies/sod-matrix.json
{
  "namespace": "sod-matrix"
}
Matrix
The next step is to make sure this galaxy is a matrix galaxy type. They keyword to use is kill_chain_order. This field has to contain one or more named tables, with the category labels. Each table is one “tab” in the matrix. In the SoD example, there are three phases which will be represented in tabs (named tables), and each phase contains the four actors (category labels).
galaxies/sod-matrix.json
{
  "kill_chain_order": {
    "during-incident-crime": [
      "CSIRT",
      "LEA",
      "Judiciary",
      "Prosecutors"
    ],
    "post-incident-crime": [
      "CSIRT",
      "LEA",
      "Judiciary",
      "Prosecutors"
    ],
    "prior-to-incident-crime": [
      "CSIRT",
      "LEA",
      "Judiciary",
      "Prosecutors"
    ]
  },
  "namespace": "sod-matrix"
}
Universally unique identifier
All objects in MISP have a UUID, a universally unique identifier. Galaxies (and clusters) are no different. You can generate these UUIDs with the Linux command uuidgen.
galaxies/sod-matrix.json
{
  "kill_chain_order": {
    "during-incident-crime": [
      "CSIRT",
      "LEA",
      "Judiciary",
      "Prosecutors"
    ],
    "post-incident-crime": [
      "CSIRT",
      "LEA",
      "Judiciary",
      "Prosecutors"
    ],
    "prior-to-incident-crime": [
      "CSIRT",
      "LEA",
      "Judiciary",
      "Prosecutors"
    ]
  },
  "namespace": "sod-matrix",
  "uuid": "50104ead-7315-457c-b596-b4471cabf28b"
}
Galaxy meta data
The final step in creating the galaxy file is adding a description, name, version and icon. Description and name are text fields, version is a numeric field indicating the version of your galaxy. The icon is one of the Font Awesome icons, without the prefix ‘fa’.
An important meta data field is the type field. This has to have the same value as the galaxy and cluster file names and is what glues the galaxy file and cluster file together.
galaxies/sod-matrix.json
{
  "description": "SoD Matrix",
  "icon": "map",
  "kill_chain_order": {
    "during-incident-crime": [
      "CSIRT",
      "LEA",
      "Judiciary",
      "Prosecutors"
    ],
    "post-incident-crime": [
      "CSIRT",
      "LEA",
      "Judiciary",
      "Prosecutors"
    ],
    "prior-to-incident-crime": [
      "CSIRT",
      "LEA",
      "Judiciary",
      "Prosecutors"
    ]
  },
  "name": "SoD Matrix",
  "namespace": "sod-matrix",
  "type": "sod-matrix",
  "uuid": "50104ead-7315-457c-b596-b4471cabf28b",
  "version": 1
}
Create the cluster
Cluster file
It’s now time to start with the cluster file. For the SoD matrix, the elements will not contain synonyms or references to other objects.
Metadata
Before jumping to the meat of the cluster, the values (or elements), we first have to add some metadata for the cluster. This is similar as the information previously added for galaxies. It includes a description, name, version and UUID.
Besides this information, it also needs additional text fields such as author, category and source. The category can be any descriptive text you prefer. The source can point to an external resource providing more details on the content of the galaxy.
clusters/sod-matrix.json
{
  "authors": [
    "Koen Van Impe"
  ],
  "category": "sod-matrix",
  "description": "SOD Matrix",
  "name": "sod-matrix",
  "source": "https://github.com/cudeso/SoD-Matrix",
  "type": "sod-matrix",
  "uuid": "f0b6036d-020d-414b-9761-ee5a972d2362",
  "version": 1
}
Add the matrix values
The next step is the biggest challenge, adding the values (elements) in a matrix format to the cluster. The values are stored in a table format.
  "values": [
  ]
The content of each element in that value table consists of a number of required fields. It should contain a description, a UUID, a value and metadata. Whereas the value is the label being displayed when you add the galaxy to an event, the description is only shown when you hover above the value in the matrix selection. Make the value as meaningful as possible as that’s the one being displayed on the event level. Also take into account that MISP sorts the values in the matrix alphabetically.
What remains is linking the values to the correct matrix tab and matrix column. This is achieved with the meta value kill_chain. The kill_chain field consists of two parts ["tab:column"]. The two parts are separated with a colon (:). When I created the galaxy, I used “during-incident-crime, post-incident-crime and prior-to-incident-crime” as the tabs and I set CSIRT, LEA, Judiciary, and Prosecutors as the columns. A sample of one value would then look like this
    {
      "description": "Development and distribution of tools for preventive and reactive mitigation",
      "meta": {
        "kill_chain": [
          "prior-to-incident-crime:CSIRT"
        ]
      },
      "uuid": "70437783-b605-4721-9cdb-97083f99d8c1",
      "value": "Analysis of vulnerabilities and threats - CSIRT - [C]"
    },
This will put “Analysis of vulnerabilities and threats” in the column “CSIRT” in the tab “prior-to-incident-crime”.
Automation, sort of …
The SoD matrix consists of a lot of values per column, and per tab. The reason is that the SoD matrix can be different for each country or context. For example, the duty ‘delivering training’ can be done by actor CSIRT in a “R-Responsible” role in country A, whereas the same duty and actor might have the role “C-Consulted” in country B. In practice this meant that I had to add each combination of duty and role for all actors. Needless to say this is a lot of copy and paste work which is better left to a script.
The script that I use to create the cluster is inspired on machinetag2human.py used to transform the Reference Security Incident Taxonomy from a machine readable format to a human readable format. I altered the code a bit so that it can now write a human readable format of the SoD matrix, as well as create the JSON files for the galaxy and cluster. More info can be found in the repository of the SoD matrix.
Automating the creation of the cluster (and galaxy) files is highly advised.
- Create one “master” JSON file which holds all the values you want to see in the matrix;
- Create the galaxy and cluster from this “master” file.
Validating the work
Once the galaxy and cluster files are created, what’s left to do is to validate the JSON files. From within the folder misp-galaxy
:/var/www/MISP/app/files/misp-galaxy# ./validate_all.sh
:/var/www/MISP/app/files/misp-galaxy# ./jq_all_the_things.sh
If no errors occur, it’s best to first test the result on your local MISP. Make sure that MISP recognises the newly created galaxies.
sudo -u www-data /var/www/MISP/app/Console/cake Admin updateGalaxies force
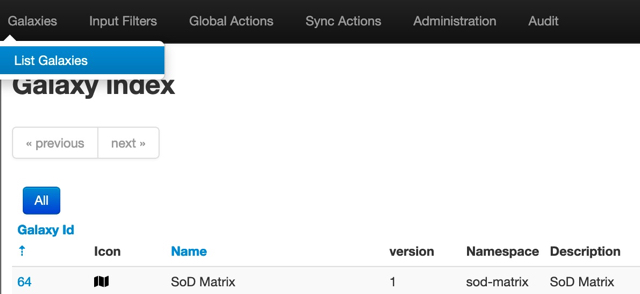
The newly created matrix should then be visible under Galaxies, List Galaxies.
If all looks good, you can do a pull request to make sure the next galaxy is available for the MISP community.