


By Koen Van Impe April 3, 2023
MISP to Azure Sentinel integration
Introduction
The MISP to Azure / Sentinel integration allows you to upload indicators from MISP to Microsoft Sentinel. It relies on PyMISP to get indicators from MISP and an Azure App and Threat Intelligence Data Connector in Azure.
The integration is available via GitHub at https://github.com/cudeso/misp2sentinel.
This repository is started from the Microsoft Graph Security API GitHub repository. Because the Microsoft repository seems no longer maintained a separate repository was started, stripped of the non-MISP items and with updated Python code. Compared to the original Microsoft repository, this now includes
- Handle attributes in objects
- Handle URLs that do not have http/https included
- Handle network direction (network_ignore_direction)
- Adjust logging - verbosity
- Ignore local tags (misp_ignore_localtags)
- Properly deal with tags on attribute level
- Add defaultConfidenceLevel
- Add sentinel-threattype
- Convert KillChain labels for Azure
Installation
Python
The integration requires Python3, a Python virtual environment and PyMISP.
- Verify you have
python3installed on your system - Create a virtual environment
virtualenv sentineland activate the environmentsource sentinel/bin/activate - Download the repository
git clone https://github.com/cudeso/misp2sentinel.git - Go to directory
cd misp2sentinel - Install the Python dependencies
pip install -r cudeso_requirements.txt
Azure
Azure App registration
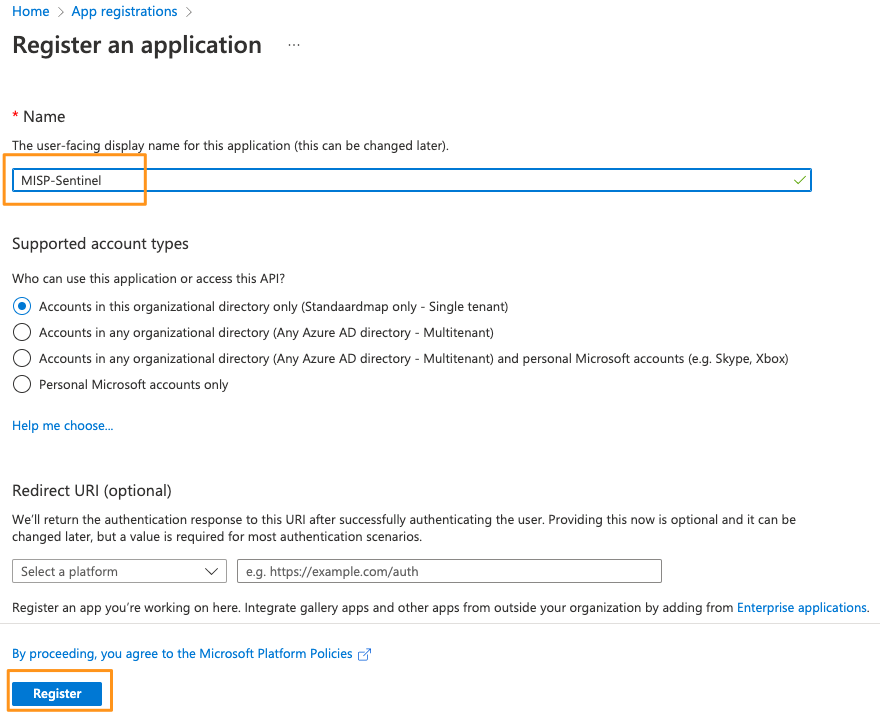
You need to register a new application in the Microsoft Application Registration Portal.
- Sign in to the Application Registration Portal.
- Choose New registration.
- Enter an application name, and choose Register. The application name does not matter but pick something that’s easy recognisable.
- From the overview page of your app note the Application ID (client) and Directory ID (tenant). You will need it later to complete the configuration.
- Under Certificates & secrets (in the left pane), choose New client secret and add a description. A new secret will be displayed in the Value column. Copy this password. You will need it later to complete the configuration and it will not be shown again.
- Under API permissions (left pane), choose Add a permission > Microsoft Graph.
- Under Application Permissions, add ThreatIndicators.ReadWrite.OwnedBy.
- Then grant consent for the new permissions via Grant admin consent for Standaardmap (Standaardmap is replaced with your local tenant setting). Without the consent the application will not have sufficient permissions.
Threat intelligence data connector
After the registration of the app it’s time to add a data connector.
- Go to the Sentinel workspace.
- Under Data connectors search for Threat Intelligence Platforms (Preview). Open the connection pane and click connect.
Configuration
Integration script
The configuration of is done via the config.py file.
First set misp_key to your MISP API key and misp_domain to the URL of your MISP server. Optionally you can also specify if the script should validate the certificate of the misp instance with misp_verifycert.
Then update tenant (Directory ID), client_id (Application client ID), and client_secret(secret client value). Also set the targetProduct and action. The targetProduct can be Azure Sentinel or Microsoft Defender ATP. The possible action values for action are: alert, allow or block.
graph_auth = {
    'tenant': '<tenant id>',
    'client_id': '<client id>',
    'client_secret': '<client secret>',
}

targetProduct = 'Azure Sentinel'
action = 'alert'

misp_key = '<misp api_key>'
misp_domain = '<misp url>'
misp_verifycert = False
Test configuration
Before you continue, test your setup by downloading all the indicators from Sentinel. This makes sure that your network connection is functional and that there are no authentication errors.
python script.py -r

Retrieve indicators from Sentinel
{
  "@odata.context": "https://graph.microsoft.com/beta/$metadata#security/tiIndicators",
  "value": []
}
If no errors occur then you’re good to go and you can continue further with the setup.
MISP configuration
To make the most of the Sentinel integration you have to enable these MISP taxonomies:
These taxonomies are used to provide additional context to the synchronised indicators and are strictly not necessary for the well-functioning of the integration. But they provide useful information for Sentinel users to understand what the threat is about and which follow-up actions need to be taken.
Integration
Additional configuration
By default, the integration only works on the events that are published (this is set in misp_event_filters). You can change this by updating the filter query. Every filter that you can use for a MISP search can be applied.
misp_event_filters = {
    "published": 1,
    "type_attribute": ['md5', 'sha256']
    "tags": [ "workflow:state=\"complete\""],
    "enforce_warninglist": 1,
    "to_ids": 1
}
By default the MISP local tags are ignored but this can be changed via misp_ignore_localtags.
The default confidence level of the indicators is 50, defined with defaultConfidenceLevel.
The lifetime of indicators is 60 days and is set via days_to_expire. This property is used to specify the amount of days after which the records will expire in Microsoft Graph Security API.
If a TLP designation is missing from the event level then the default Sentinel TLP designation is set to tlp:red.
The event title (info) is used to set the indicator description.
Tags from the diamond-model taxonomy are set to the Sentinel properties for diamondModel. See for the different values at https://learn.microsoft.com/en-us/graph/api/resources/tiindicator?view=graph-rest-beta#diamondmodel-values.
Tags from the sentinal-threattype taxonomy are set to the Sentinel properties for threattype. See for the different values at https://learn.microsoft.com/en-us/graph/api/resources/tiindicator?view=graph-rest-beta#threattype-values.
Tags from the kill-chain taxonomy are set to the Sentinel properties for killChain. See for the different values at https://learn.microsoft.com/en-us/graph/api/resources/tiindicator?view=graph-rest-beta#killchain-values. Note that Sentinel uses C2 and Actions instead of “Command and Control” and “Actions on Objectives”. The import script takes care of the translation.
Tags from the MISP attribute level take precedence on the tags from the MISP event level.
The MISP attributes threat-actor are set to Sentinel property activityGroupNames. The MISP attributes comment are added to the Sentinel description.
Field mappings
The attribute type matchings are defined in constants.py.
ATTR_MAPPING = {
    'AS': 'networkSourceAsn',
    'email-dst': 'emailRecipient',
    'email-src-display-name': 'emailSenderName',
    'email-subject': 'emailSubject',
    'email-x-mailer': 'emailXMailer',
    'filename': 'fileName',
    'malware-type': 'malwareFamilyNames',
    'mutex': 'fileMutexName',
    'port': 'networkPort',
    'published': 'isActive',
    'size-in-bytes': 'fileSize',
    'url': 'url',
    'user-agent': 'userAgent',
    'uuid': 'externalId',
    'domain': 'domainName',
    'hostname': 'domainName'
}
There are also special cases covered in other sections of the Python code.
MISP_SPECIAL_CASE_TYPES = frozenset([
    *MISP_HASH_TYPES,
    'url',
    'ip-dst',
    'ip-src',
    'domain|ip',
    'email-src',
    'ip-dst|port',
    'ip-src|port'
])
- ip-dst and ip-src
-
- mapped to either
networkDestinationIPv4,networkDestinationIPv6ornetworkSourceIPv4,networkSourceIPv6
- mapped to either
-
- if the configuration value
network_ignore_directionis set to true then the indicator is also mapped tonetworkIPv4,networkIPv6
- if the configuration value
- domain|IP
-
- Mapped to a domain and an IP
domainName
- Mapped to a domain and an IP
-
- An IP without a specification of a direction
networkIPv4,networkIPv6
- An IP without a specification of a direction
- email-src
-
- Mapped to a sender address
emailSenderAddress
- Mapped to a sender address
-
- And to a source domain
emailSourceDomain
- And to a source domain
- ip-dst|port and ip-src|port
-
- apped to either
networkDestinationIPv4,networkDestinationIPv6ornetworkSourceIPv4,networkSourceIPv6
- apped to either
-
- if the configuration value
network_ignore_directionis set to true then the indicator is also mapped tonetworkIPv4,networkIPv6
- if the configuration value
-
- The port is mapped to
networkSourcePort,networkDestinationPort
- The port is mapped to
-
- if the configuration value
network_ignore_directionis set to true then the indicator is also mapped tonetworkPort
- if the configuration value
- url
-
- MISP URL values that do not start with http or https or changed to start with http. Azure does not accept URLs that do not start with http
The supported hashes are defined in the set MISP_HASH_TYPES.
Further details on the specifics of the indicators can be found on the Azure Sentinel website.
Cron job
It is best to run the integration is from the cron of user www-data.
# Sentinel
00 5 * * * cd /home/misp/misp2sentinel/ ; /home/misp/misp2sentinel/venv/bin/python /home/misp/misp2sentinel/script.py
Script output
As the script runs, it prints out the request body sent to the Microsoft Graph Security API and the response from the Microsoft Graph Security API. Every request is logged as a json file under the directory “logs”. The name of the json file is the datetime of when the request is completed. The script logs the POST errors into this log directory. These POST errors are also in JSON format and can be reviewed to analyse synchronisation errors. Typical errors include rejected IPv4 CIDR ranges or malformed URLs.
You can disable the output to JSON with the option write_post_json.
Additional documentation
- https://www.vanimpe.eu/2022/04/20/misp-and-microsoft-sentinel/
- https://techcommunity.microsoft.com/t5/microsoft-sentinel-blog/integrating-open-source-threat-feeds-with-misp-and-sentinel/ba-p/1350371
- https://learn.microsoft.com/en-us/graph/api/tiindicators-list?view=graph-rest-beta&tabs=http
- Microsoft Graph Security Documentation
- Microsoft Graph Explorer
- Microsoft code samples
- MISP to Microsoft Graph Security connector