


By Luciano Righetti October 6, 2025
Wazuh–MISP Integration: Real-Time Threat Detection with File Hashes
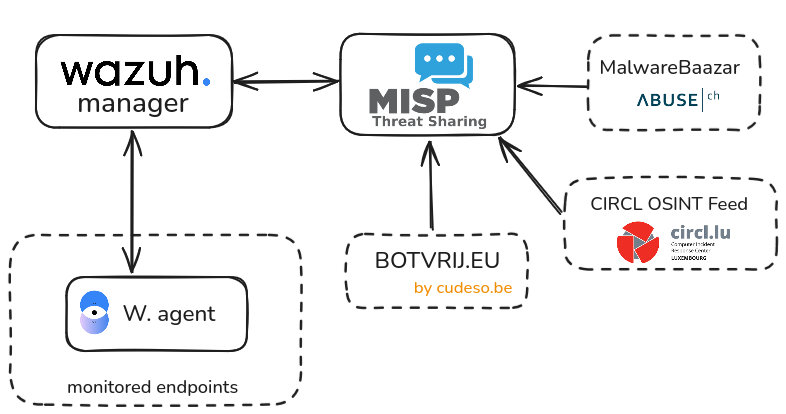
The goal of this tutorial is to integrate MISP with Wazuh, enabling automated threat intelligence correlation. When a new file is created on a monitored endpoint, Wazuh will query its hash against indicators stored in the MISP instance. If a match is found, Wazuh will automatically generate an alert, enhancing detection and response capabilities.
- GitHub repo: https://github.com/MISP/wazuh-integration
Requirements
- A running MISP instance.
- A running Wazuh instance.
- One or more Wazuh agents running on a monitored host.
Wazuh
Configuring directory monitoring
First we need to configure our Wazuh agents to enable filesystem monitoring on the directories we are interested in.
On Ubuntu the agent configuration file is usually located in /var/ossec/etc/ossec.conf.
We can instruct the Wazuh agent to monitor a directory using the <directories> configuration block as follows:
<ossec_config>
  <syscheck>
    <disabled>no</disabled>
    <directories check_all="yes" realtime="yes">MONITORED_DIRECTORY_PATH</directories>
  </syscheck>
</ossec_config>
check_allallows checks of the file size, permissions, owner, last modification date, inode, and the hash sums (MD5, SHA1, and SHA256).
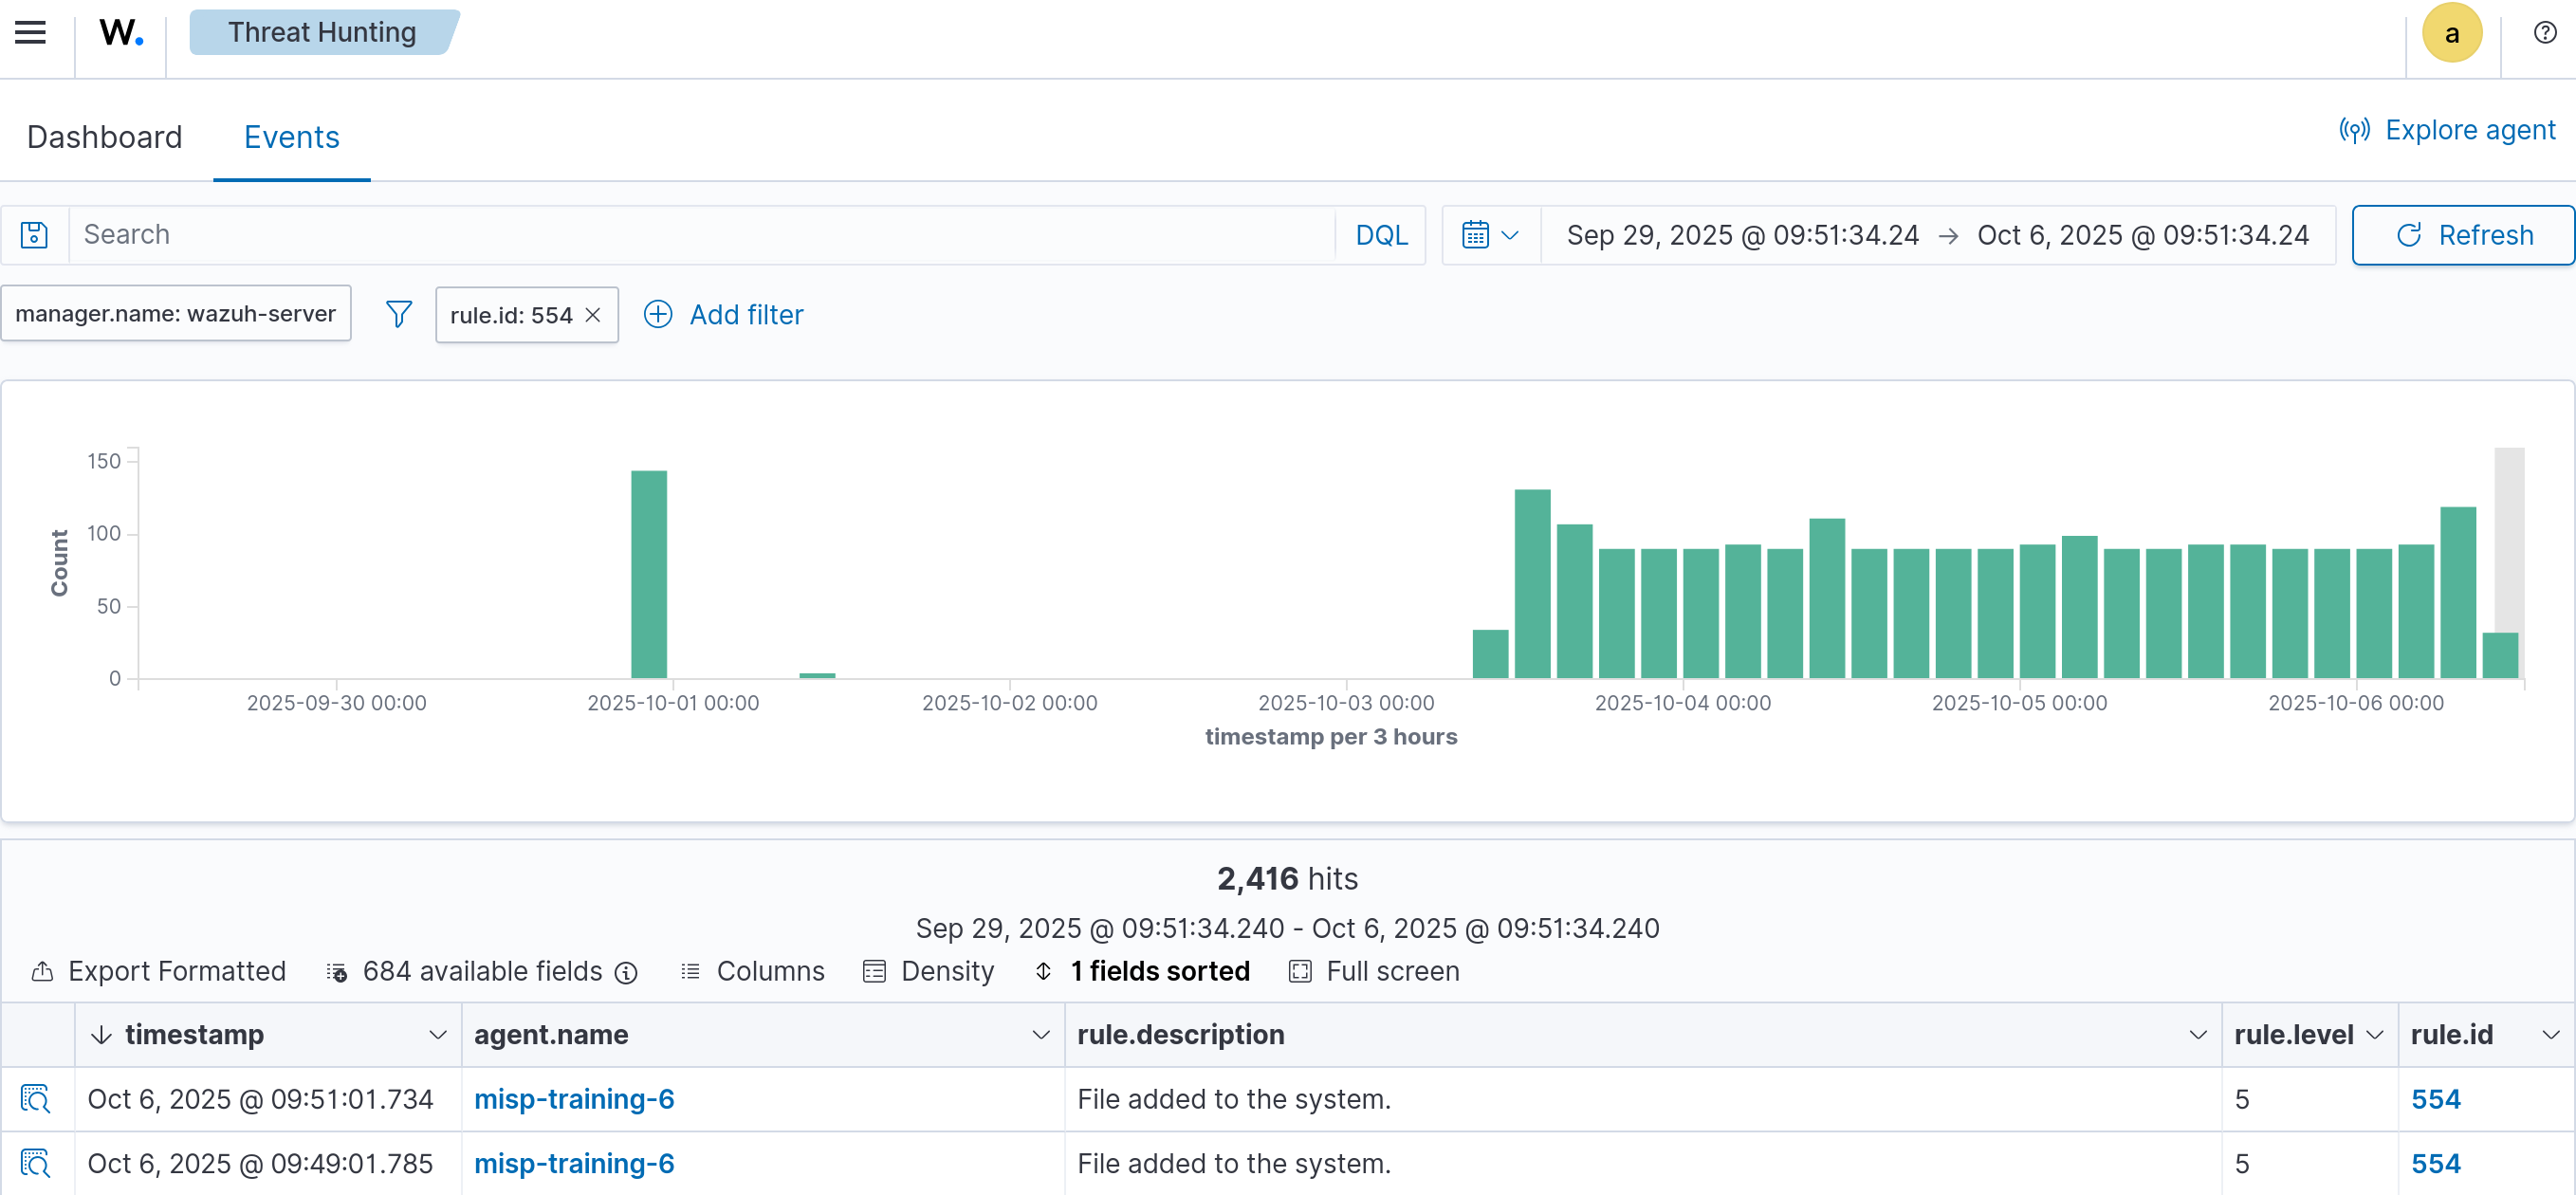
When a new file is added to the monitored directory, Wazuh generates an alert (ID 554) containing file metadata such as hashes, file size, name, and permissions.
After making changes to the
ossec.conffile, restart the Wazuh agent to apply the configuration changes.
systemctl restart wazuh-agent
Now, create a file in the monitored directory and you should see an ID 554 on the Wazuh Threat Hunting dashboard.
MISP integration
Wazuh includes an Integrator module that lets us automate interactions with external services. It already provides built-in integrations for popular platforms like Slack, PagerDuty, VirusTotal, Shuffle, and Maltiverse.
In this lab, we’ll take advantage of its flexibility to build our own custom integration using a Python script. This will allow Wazuh to communicate with our MISP instance and automatically check new file hashes against known threat indicators.
MISP integration script
Based on the VirusTotal integration script, we wrote a new script called custom-misp-file-hashes.py. This file must be placed in the /var/ossec/integrations directory in the Wazuh Server.
Download the custom-misp-file-hashes.py script.
After creating the custom-misp_file_hashes.py file in the /var/ossec/integrations directory, we have to adjust the file permissions:
chmod 750 misp_file_hashes.py
chown root:wazuh misp_file_hashes.py
Important: When creating a custom integration, the Python script file name has to start with
custom-, otherwise the Integrator module will ignore it.
Next, configure Wazuh server to use this integration by adding the <integration> block to the /var/ossec/etc/ossec.conf file.
<ossec_config>
    <integration>
        <name>custom-misp_file_hashes.py</name>
        <hook_url>https://YOUR_MISP_INSTANCE</hook_url>
        <api_key>YOUR_API_KEY</api_key>
        <group>syscheck</group>
        <rule_id>554</rule_id>
        <alert_format>json</alert_format>
        <options>{
              "timeout": 10,
              "retries": 3,
              "debug": false,
              "tags": ["tlp:white", "tlp:clear", "malware"],
              "push_sightings": true,
              "sightings_source": "wazuh"
          }
        </options>
    </integration>
</ossec_config>
<hook_url>: Your MISP instance URL.<api_key>: A valid MISP API AuthKey.<group>: Filters alerts sent to the integration script only if they belong to a given list of groups. The allowed values are any rule group or comma-separated rule groups.<rule_id>: filters alerts by rule ID. The allowed values are any rule group or comma-separated rule groups.
After making changes to the
ossec.conffile, restart the Wazuh Manager to apply the configuration changes.
systemctl restart wazuh-manager
Wazuh rules
Once we are receiving file creation alerts from our agent and these are being processed by our MISP integration, we need to define some rules in Wazuh.
In the Wazuh UI, navigate to Server Management → Rules, then click (+) Add new rules file.
Name the file misp_file_hashes.xml
Add the following content to the rules file:
<group name="misp,malware,">
    <rule id="100800" level="0">
        <decoded_as>json</decoded_as>
        <description>MISP: file hash check</description>
        <field name="integration">misp_file_hashes</field>
        <options>no_full_log</options>
    </rule>
    <rule id="100801" level="0">
        <if_sid>100800</if_sid>
        <field name="misp_file_hashes.found">0</field>
        <description>MISP: file hash not found</description>
    </rule>
    <rule id="100802" level="12">
        <if_sid>100800</if_sid>
        <field name="misp_file_hashes.found">1</field>
        <description>MISP: file hash matched</description>
    </rule>
    <rule id="100803" level="10">
        <if_sid>100800</if_sid>
        <field name="misp_file_hashes.error">403</field>
        <description>MISP ERROR: Invalid MISP credentials, check your the api_key setting configured
            in the MISP integration is valid MISP AuthKey</description>
    </rule>
    <rule id="100803" level="10">
        <if_sid>100800</if_sid>
        <field name="misp_file_hashes.error">429</field>
        <description>MISP ERROR: Rate limit exceeded, too many requests</description>
    </rule>
    <rule id="100804" level="10">
        <if_sid>100800</if_sid>
        <field name="misp_file_hashes.error">500</field>
        <description>MISP ERROR: $(misp_file_hashes.description)</description>
    </rule>
</group>
After saving the rules, restart the Wazuh Manager.
Test
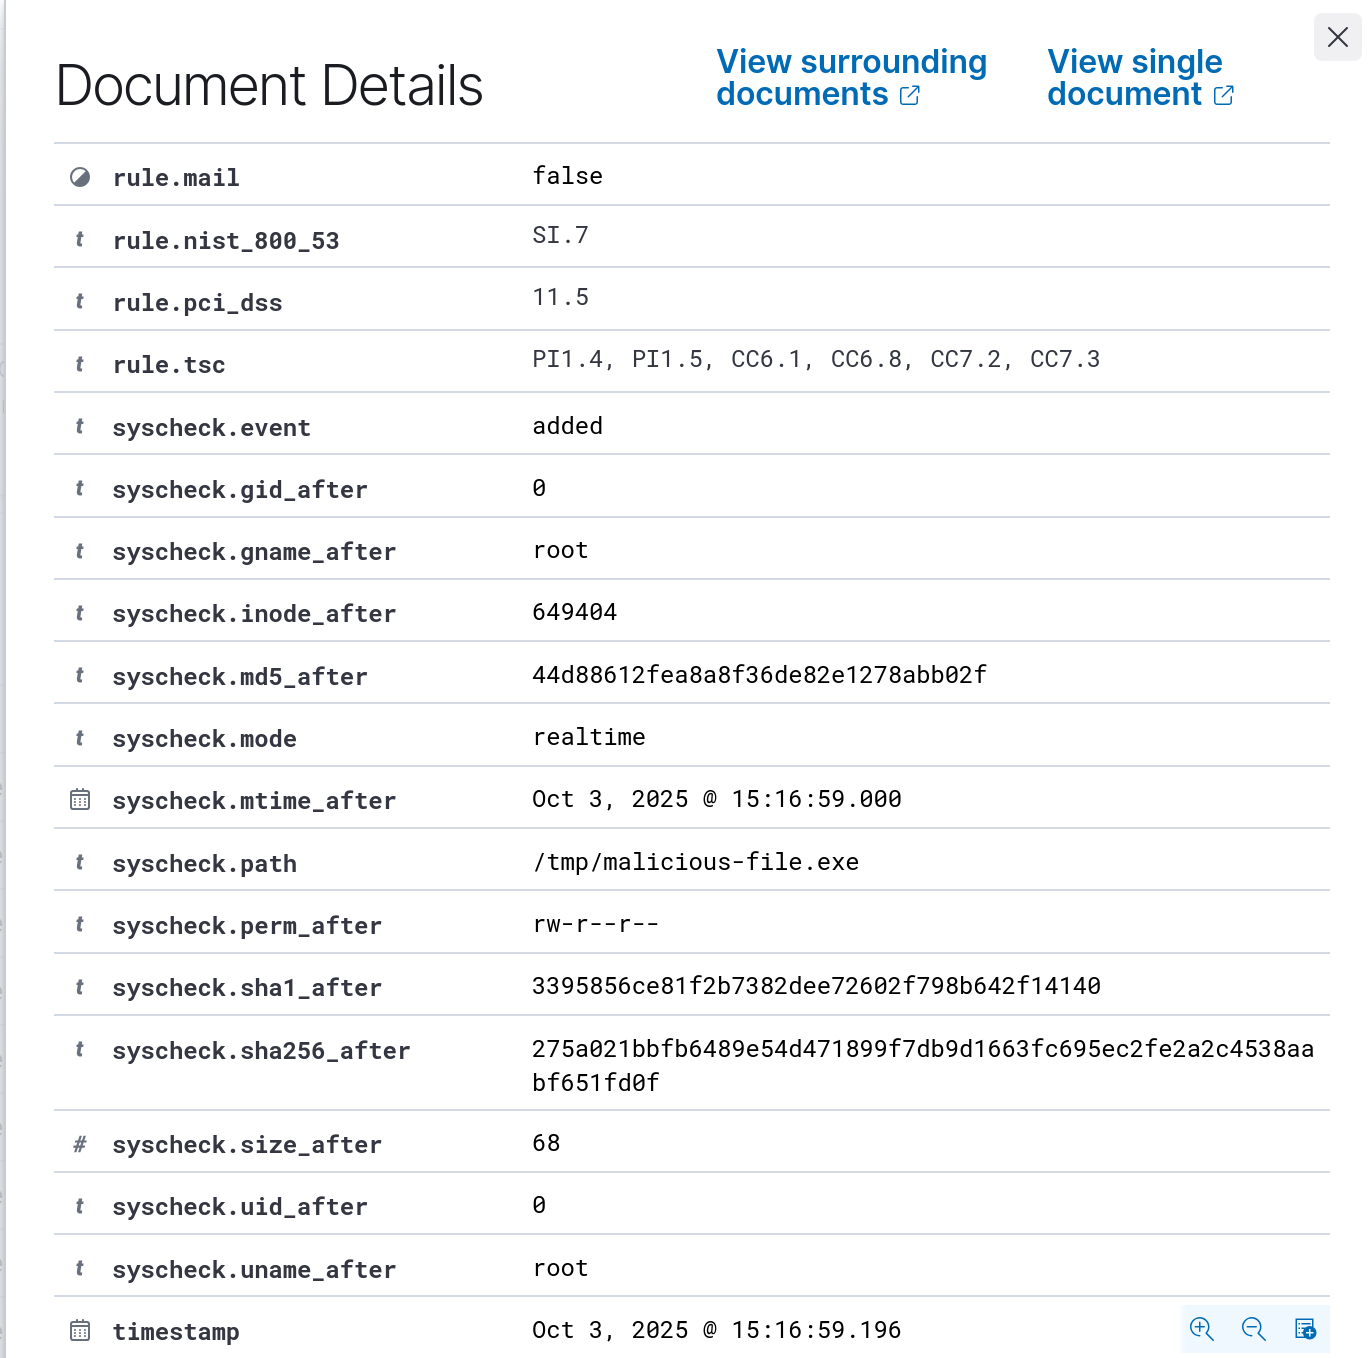
To trigger a positive match in MISP, add any of the eicar.com hashes to your MISP instance.
- MD5:
44d88612fea8a8f36de82e1278abb02f - SHA1:
3395856ce81f2b7382dee72602f798b642f14140 - SHA256:
275a021bbfb6489e54d471899f7db9d1663fc695ec2fe2a2c4538aabf651fd0f
Make sure the event containing the hashes is visible to the user associated with the API AuthKey, otherwise no match will occur.
Some other recommended free feeds that share malware hashes and can be ingested in MISP:
- MalwareBazaar by ABUSE.ch: https://bazaar.abuse.ch/downloads/misp/
- CIRCL OSINT Feed: https://www.circl.lu/doc/misp/feed-osint
- BOTVRIJ.EU by cudeso.be: https://www.botvrij.eu/data/feed-osint
Inside the monitored host, download eicar.com file to the monitored directory.
curl -Lo /tmp/malicious-file.exe https://secure.eicar.org/eicar.com
If we go to the Threat intelligence → Threat Hunting → Events panel in Wazuh, a rule ID 554 and ID 100802 should be created.
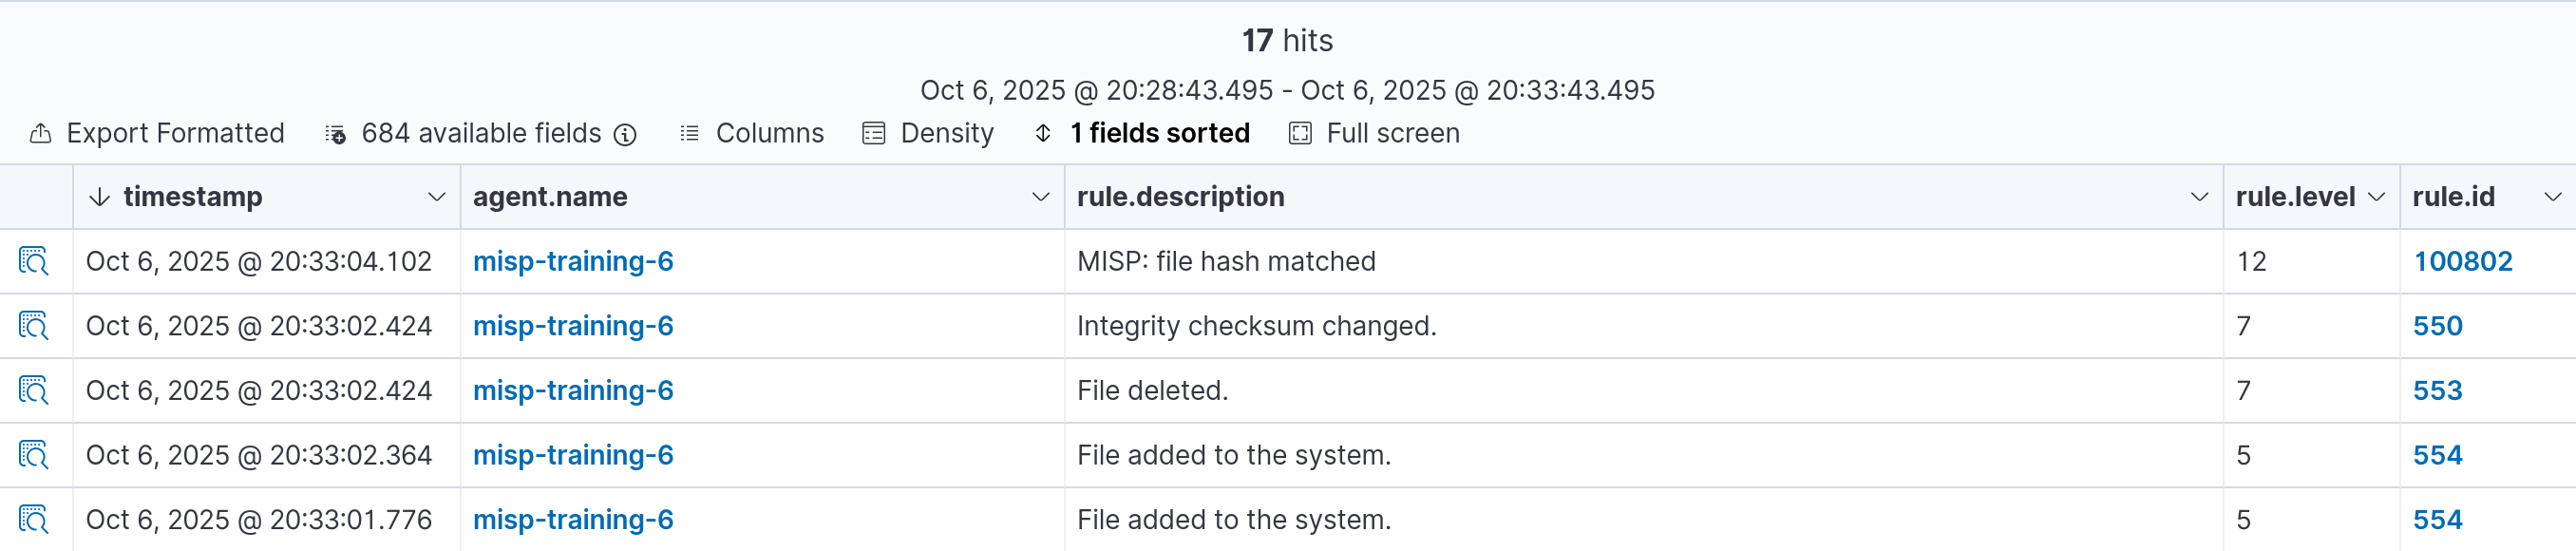
Done!
Additionally, you can leverage Wazuh Active Response module to act on this alert and automatically delete or run additional actions. Read more about this here and check this tutorial.
Debugging tips
Inside the Wazuh server, check that file creations are generating alerts:
tail -f /var/ossec/logs/alerts/alerts.log
Enable Integrator module logs:
Open the /var/ossec/etc/internal_options.conf file and change the following configuration:
# Integrator daemon debug (server, local or Unix agent)
integrator.debug=2
Restart Wazuh manager:
systemctl restart wazuh-manager
Check Integrator daemon logs:
tail -f /var/ossec/logs/ossec.log | grep wazuh-integratord
To enable debug mode in the integration script, add the following JSON to the <integration> block:
{ "debug": true}
Example:
<ossec_config>
    <integration>
        <name>custom-misp_file_hashes.py</name>
        <hook_url>https://YOUR_MISP_INSTANCE</hook_url>
        <api_key>YOUR_API_KEY</api_key>
        <group>syscheck</group>
        <rule_id>554</rule_id>
        <alert_format>json</alert_format>
        <options>{ "debug": true}</options>
    </integration>
</ossec_config>
Check the integration script logs:
tail -f /var/ossec/logs/integrations.log
# Running MISP File Hashes script
# Opening alert file at '/tmp/custom-misp_file_hashes.py-1759768502-1854171349.alert' with '{'timestamp': '2025-10-06T16:35:02.239+0000', 'rule': {'level': 5, 'description': 'File added to the system.', 'id': '554', 'firedtimes': 1, 'mail': False, 'groups': ['ossec', 'syscheck', 'syscheck_entry_added', 'syscheck_file'], 'pci_dss': ['11.5'], 'gpg13': ['4.11'], 'gdpr': ['II_5.1.f'], 'hipaa': ['164.312.c.1', '164.312.c.2'], 'nist_800_53': ['SI.7'], 'tsc': ['PI1.4', 'PI1.5', 'CC6.1', 'CC6.8', 'CC7.2', 'CC7.3']}, 'agent': {'id': '001', 'name': 'misp-training-6', 'ip': '10.64.247.71'}, 'manager': {'name': 'wazuh-server'}, 'id': '1759768502.1515375', 'full_log': "File '/tmp/systemd-private-94bf61040c334f479bf6147139111b66-apache2.service-qI66Ip/tmp/php08wBlT' added\nMode: realtime\n", 'syscheck': {'path': '/tmp/systemd-private-94bf61040c334f479bf6147139111b66-apache2.service-qI66Ip/tmp/php08wBlT', 'mode': 'realtime', 'size_after': '5265586', 'perm_after': 'rw-------', 'uid_after': '33', 'gid_after': '33', 'md5_after': '15a579c2901ec26cbef176f52402c2ff', 'sha1_after': '34f3a15884a92eb4f3039f4779e321cc4ea8cff8', 'sha256_after': 'dbfc239b5b3544a692a1846fd8fd3e356f9f110c58406a688be542777cc5f783', 'uname_after': 'www-data', 'gname_after': 'www-data', 'mtime_after': '2025-10-06T16:35:02', 'inode_after': 235626, 'event': 'added'}, 'decoder': {'name': 'syscheck_new_entry'}, 'location': 'syscheck'}'
# Requesting MISP information
# Querying MISP API
# Request result from MISP server: 1:misp_file_hashes:{"misp_file_hashes": {"error": 403, "description": "Error: Check credentials"}, "integration": "misp_file_hashes"}
# Error: MISP credentials, required privileges error
References:
- https://wazuh.com/blog/detecting-and-responding-to-malicious-files-using-cdb-lists-and-active-response/
- https://documentation.wazuh.com/current/user-manual/manager/integration-with-external-apis.html
- https://wazuh.com/blog/how-to-integrate-external-software-using-integrator/
Funding
This project is developed in the scope of the NGSOTI project and co-funded under Digital Europe Programme by the ECCC (European Cybersecurity Competence Centre and Network).
The NGSOTI project is dedicated to training the next generation of Security Operation Center (SOC) operators, focusing on the human aspect of cybersecurity. It underscores the significance of providing SOC operators with the necessary skills and open-source tools to address challenges such as detection engineering, incident response, and threat intelligence analysis. Involving key partners such as CIRCL, Restena, Tenzir, and the University of Luxembourg, the project aims to establish a real operational infrastructure for practical training. This initiative integrates academic curricula with industry insights, offering hands-on experience in cyber ranges.